Sculpting Sci-Fi Centurions
你好,
Well, I've finally begun working on my own creation for sculpting! Yup, I've pulled out the greenstuff. For me this is a big step and it has been a fun couple of days working on this single "Centurion". After many days of researching how to make 15mm armatures, sculpting techniques and ideas I pulled this idea out. Here is my process for making a miniature (with the materials I had) and the idea behind the miniature.


The first step was to draw out exactly what I wanted in this miniature. So I began taking some reference images and drew some sketches that were to scale. Meaning, these drawings had to be 15mm high and contain all the detail I wanted them to have. It was difficult but made easier by a really fine graphite pencil. Then I chose which pose I liked (the first "commander" pose) and drew out the armature idea to scale. I basically traced a stick figure based on my drawing. Now comes the fun part, making the armature.
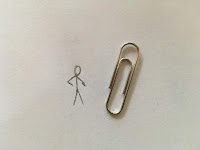
For the armature usually you use a thin gauge copper wire but I didn't have that at the time so I used a paperclip, paper clay, and super glue. This was difficult and time consuming so if you have thin copper wire use it as you can just bend it into shape!
 Here was the result of my armature. I compared it to the sketch armature and the drawing to make sure I had the size correct. Luckily it was and I went to sculpting!


Sadly, I didn't get any photos of the WIP sculpting but I can tell you what I did. Day One, I applied a thin layer of greenstuff all on the armature to give it strength and a basic layout of the body. Here is where you would want to practice sculpting calves, biceps, and other muscles of the body. This day I also made the helmet but I made it separate. I put a ball of greenstuff on a paper clip and sculpted the helmet. I waited a day for it to cure. Day Two, I began to work on the armor. My idea was to have a modern looking chest rig but instead I created strips of greenstuff and layered them like Centurion armor. It looked cool and was way easier. Sadly the armor in the back got a bit "smooshed". I also sculpted the shoulder and armor pads out of flattened but cured greenstuff and used a little new greenstuff to make it stick to the figure. I waited another day before working on the weapon. Day Three I worked on the weapon and hands. The weapon was easy as its two cut pieces of wire with greenstuff. The hand that is pointing is my proudest piece of work on the miniature as I'm happy the finger stayed! Then that was it. It was complete.

 I know its not the best miniature in the world but I was able to make it the way I wanted to make it. Sure it is slightly different than my original idea but once painted and put in an army I believe they will look cool which leads me to my next project, casting miniatures.
I was able to get copper wire thanks to a jewelry making store and am already working on the many other poses I wish to have in the "Sci-Fi Centurion" group. Once I've made about 12 different poses (hopefully I can do that!) I would like to cast them in molds and make copies which then will be painted.
A Side Note: All those days of sculpting with the cheap paper clay and making those "doughboy" miniatures of chinese and japanese soldiers really paid off. I spent about a month making those before I moved on to a bigger project such as this as greenstuff for me is expensive so I want to do my best with what I have.
Anyways, that is what I've been working on. I hope to have many more Sci-Fi Centurions to show you in the next couple weeks to come. What I'd love to have is different weapons and poses ranging from standing, crouched, prone and snipers, grenades, machine gunners and more. I've already began to sketch out ideas for vehicles that I'd love to make out of paper and cardboard. Ahh the possiblities.
Have a good day,
Jonah
Well, I've finally begun working on my own creation for sculpting! Yup, I've pulled out the greenstuff. For me this is a big step and it has been a fun couple of days working on this single "Centurion". After many days of researching how to make 15mm armatures, sculpting techniques and ideas I pulled this idea out. Here is my process for making a miniature (with the materials I had) and the idea behind the miniature.


The first step was to draw out exactly what I wanted in this miniature. So I began taking some reference images and drew some sketches that were to scale. Meaning, these drawings had to be 15mm high and contain all the detail I wanted them to have. It was difficult but made easier by a really fine graphite pencil. Then I chose which pose I liked (the first "commander" pose) and drew out the armature idea to scale. I basically traced a stick figure based on my drawing. Now comes the fun part, making the armature.
For the armature usually you use a thin gauge copper wire but I didn't have that at the time so I used a paperclip, paper clay, and super glue. This was difficult and time consuming so if you have thin copper wire use it as you can just bend it into shape!


Sadly, I didn't get any photos of the WIP sculpting but I can tell you what I did. Day One, I applied a thin layer of greenstuff all on the armature to give it strength and a basic layout of the body. Here is where you would want to practice sculpting calves, biceps, and other muscles of the body. This day I also made the helmet but I made it separate. I put a ball of greenstuff on a paper clip and sculpted the helmet. I waited a day for it to cure. Day Two, I began to work on the armor. My idea was to have a modern looking chest rig but instead I created strips of greenstuff and layered them like Centurion armor. It looked cool and was way easier. Sadly the armor in the back got a bit "smooshed". I also sculpted the shoulder and armor pads out of flattened but cured greenstuff and used a little new greenstuff to make it stick to the figure. I waited another day before working on the weapon. Day Three I worked on the weapon and hands. The weapon was easy as its two cut pieces of wire with greenstuff. The hand that is pointing is my proudest piece of work on the miniature as I'm happy the finger stayed! Then that was it. It was complete.


I was able to get copper wire thanks to a jewelry making store and am already working on the many other poses I wish to have in the "Sci-Fi Centurion" group. Once I've made about 12 different poses (hopefully I can do that!) I would like to cast them in molds and make copies which then will be painted.
A Side Note: All those days of sculpting with the cheap paper clay and making those "doughboy" miniatures of chinese and japanese soldiers really paid off. I spent about a month making those before I moved on to a bigger project such as this as greenstuff for me is expensive so I want to do my best with what I have.
 |
| 3 More poses made of bent copper wire. |
Have a good day,
Jonah

Comments
Post a Comment